
Table of Contents
Secure remote access is essential for managing cloud infrastructure — especially in fast-moving environments. At 2ops, we help our clients implement scalable, secure access to Azure resources without overcomplicating the process.
In this guide, you’ll learn how to configure the Azure VPN Client on macOS to connect to your Azure virtual network using point-to-site (P2S) VPN with Microsoft Entra ID authentication. Whether you’re using an Intel or Apple Silicon Mac, we’ll walk you through every step.
Prerequisites
Before you begin, make sure you meet the following requirements:
- Your Azure VPN Gateway is configured for point-to-site (P2S) connections using Microsoft Entra ID authentication.
- Your Mac is running a supported operating system version. The Azure VPN Client currently supports the following macOS releases:
– macOS 15 (Sequoia)
– macOS 14 (Sonoma)
– macOS 13 (Ventura)
– macOS 12 (Monterey)
- Your processor is supported. Both Intel (x64) and Apple Silicon (Arm64) chips are compatible.
- If you’re using an M-series Mac, and your Azure VPN Client version is older than 2.7.101, you’ll need to install Rosetta. This allows the app to run properly on Apple Silicon. You can download Rosetta from Apple’s support site.
Note: The Azure VPN Client is currently not available in France or China due to local restrictions.
Workflow at a Glance
Here’s what the setup process looks like from start to finish:

Step-by-step Setup
Once you’ve met all the prerequisites, follow these steps to install and configure the Azure VPN Client on your Mac.
1. Download and Install the Azure VPN Client
- Open the App Store.
- Search for Azure VPN Client and download the latest version.
- Once installed, launch the app to confirm it opens without issues.
If you’re using an M-series and installed a version older than 2.7.101, make sure Rosetta is installed.
2. Extract the VPN Client Profile
- Locate the VPN client profile configuration package you downloaded when setting up your VPN Gateway.
- If you haven’t downloaded it yet, return to your Azure portal and generate a new one.
- Unzip the downloaded package and open the AzureVPN folder.
- Inside, you’ll find either azurevpnconfig_aad.xml or azurevpnconfig.xml, containing the configuration details.
If the AzureVPN folder or .xml files are missing, verify that your VPN Gateway is configured to use the OpenVPN tunnel type and that Microsoft Entra ID authentication is enabled.
3. Modify the Configuration File
If your P2S setup uses a custom audience ID tied to your Microsoft-registered App ID, you may get repeated prompts to log in. This happens when the VPN client is missing the necessary audience and application ID details.
To fix this:
- Open the .xml config file in a plain text editor.
- Add the following snippet, replacing placeholders with your actual values:
					<aad>
   <audience>{customAudienceID}</audience>
   <issuer>https://sts.windows.net/{tenant ID}/</issuer>
   <tenant>https://login.microsoftonline.com/{tenant ID}/</tenant>
   <applicationid>c632b3df-fb67-4d84-bdcf-b95ad541b5c8</applicationid>
</aad>
Save the file once your changes are complete.
4. Import the VPN Configuration
- Open the Azure VPN Client.
- On the main screen, click Import.
- Navigate to the extracted AzureVPN folder and select your .xml file.
- Review the connection settings. Most fields will auto-populate based on the configuration file.
Important things to check:
- Certificate Information should show: DigiCert Global Root G2
- Authentication Type should be set to Microsoft Entra ID
- Audience must match what’s configured in your VPN Gateway
Once verified, click Save.
5. Connect to Azure
- In the VPN Connections panel, select your newly imported profile.
- Click Connect.
- If prompted, sign in using your Microsoft Entra ID credentials.
- When the connection is successful, the status will update to Connected.
To disconnect, simply click Disconnect in the client.
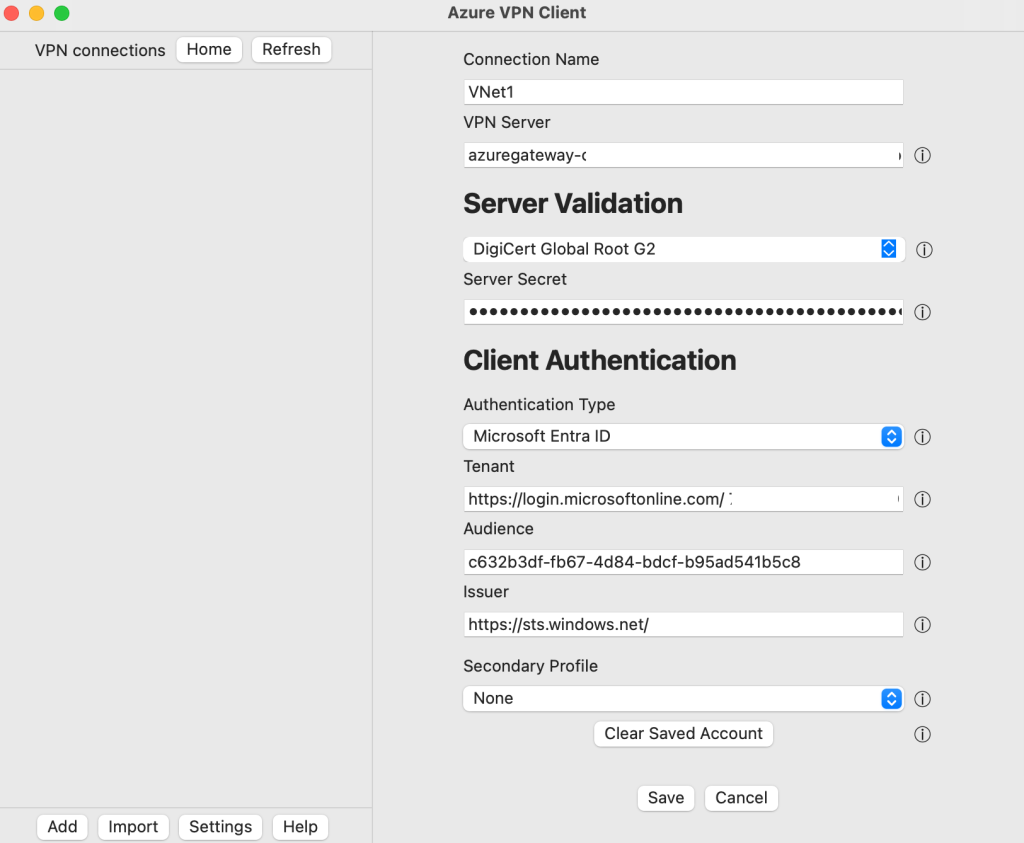
Create the Profile Manually
If importing the config file doesn’t work, you can create a profile from scratch:
- Open the Azure VPN Client and click Add
- Fill in the following fields:
- Connection Name: The name by which you want to refer to the connection profile.
- VPN Server: Your VPN Gateway address
- Server Validation
- Certificate Information: DigiCert Global Root G2
- Server Secret: The server secret
- Client Authentication
- Authentication Type: Microsoft Entra ID
- Tenant: Your tenant name or ID
- Audience: The Audience value must match the value that your P2S gateway is configured to use. Typically, this value is c632b3df-fb67-4d84-bdcf-b95ad541b5c8.
- Issuer: Name of the issuer
- Click Save.
- Select the profile and click Connect.
Optional Settings
Want more control over your connection? The Azure VPN Client supports extra settings like:
- Custom DNS and additional DNS servers
- Split tunneling and forced tunneling
- Route filtering and custom traffic control
For advanced configuration, check out optional settings here.
You’re Connected — What’s Next?
Once you’re connected, you can securely access Azure resources like private APIs, databases, and other internal tools. If your team uses multiple environments (like Dev, QA, and Prod), keep in mind that you’ll need a separate VPN profile for each one — and can only stay connected to one at a time.
If you’re running into issues or want to integrate VPN access with broader infrastructure automation or security policies, 2ops can help.